Tuesday, July 31, 2012

bedtime calculator

sleepyti.me
Here is the direct link for: Bedtime Calculator.

Every wonder why some mornings you feel so rested and others like you got up on the wrong side of the bed?

This idea of a bedtime calculator is a cool idea. The premise is that our nightly sleep time consists of several 1-1/2 hour cycles and depending on when you fall asleep and eventually wake up within these cycles can determine whether you will awake feeling rested or not.

The site (unclear the actual source) says that "it takes the average human fourteen minutes to fall asleep" and "a good night's sleep consists of 5-6 complete sleep cycles. Each sleep cycle lasts about 90 minutes". So if you were to wake up in mid-cycle then you would feel more tired and groggy, but waking up at the end or beginning of a fresh cycle will leave you more alert and refreshed.
The link is a calculator that allows you to type in either your bedtime OR desired wake time. The calculator then gives you the times to wake up OR the times to actually go to bed. For instance, if you were to fall asleep tonight around 10:00 P.M., then the best times to wake up are: 11:30 P.M. or 4:00 A.M. or 5:30 A.M. or 7:00 A.M. Remember that it takes an average of 14 minutes to fall asleep!

I use this calculator on a weekly basis. I have an ongoing commitment in which I need to get up at 1:30 A.M. on Friday mornings. And when I plan accordingly, I wake up more refreshed even after only being asleep for 3 or so hours!


The red pin award for great resource that is helpful!


Happy pinning!


Monday, July 30, 2012

how to get white toe nails


Here is the direct link for: How to Get White Toe Nails.

I wear polish on my toes especially during the summer months. I do it myself. I like them polished mainly because of the yellowing that occurs from wearing polish for long periods of time. When cooler weather comes I give my toes a breather and let the yellow color naturally grow out. Who ever knew you could get faster results?

This pin comes from the blog, Shape. This site gives lots of little beauty tips like this one for whiter nails. This tip comes from Roxanna Sarmiento, a beauty and style writer. Her actual tip is this: "If you get yellow nails after months of wearing dark polish, try scrubbing your toenails with a nail brush and whitening toothpaste. It gets rid of the yellow color."

This actual white nails pin gives a different formula for whiter nails: "Make a paste using 1 tablespoon of hydrogen peroxide and 2-1/4 tablespoons of baking soda. Let the paste sit on your nails for 5 minutes and rinse off."

I didn't have an extra toothbrush and didn't want to use mine on my toes. So I tried the baking soda method instead. Surprise, surprise, surprise! My toe nails were whiter, less yellowy. More is better so I tried it again for another 5 minutes. They were even more white. I should of taken a 'before' and 'after' photo, they were that dramatically changed.

Now I am admiring my new white toe nails and have no urge to polish in the near future.


The red pin award for it actually working! plus the bonus feature of my new white toe nails!

Here is another site I found, The Fun Times Guide, that gives more tips for whitening nails using lemon juice and more. Great resource!


Happy pinning!

Sunday, July 29, 2012

glass etching


Here is the direct link for: Glass Etching.

This idea comes from the blog, Make It and Love it. The blog's author, Ashley, has some fresh ideas for creative gift giving. She gives a great tutorial through photos on how to etch glass like my pyrex serving pan above.

All you need is a little time and the necessary tools: sheet of vinyl, stencil, exacto knife with sharp blade, Armour Etch (found at Michael's) and the glass item to etch on.

Ashley gives the example of putting your last name on a Pyrex dish that you bring to potlucks all the time. Great idea! 

Armour Etch is an acid cream. Ashley scares you a little with her statement, "Again, this process makes the etching permanent. The cream is an acid, and etches away at the surface of your glass . . . . transforming the look of your glass permanently. So you cannot rub or wash the etching off." So pick a simple design you can live with for the rest of your life or until you accidentally break the dish and need to purchase another.

The instructions on the bottle of Armour Etch says to leave the cream on the glass for one minute, but Ashley left hers on for 10 minutes. I did 10 minutes too. And then I reapplied it and had it sit for another 10 minutes. I wanted to see if it would turn whiter and it slightly did.

There definitely is a learning curve working with the vinyl, getting it on straight and getting the words centered within the pan edge. Mine could use a some tweeking, but overall I am pleased with my results and my 'new' pan.


The red pin award for working out of my comfort zone (using the acid), plus for my new pan!

This would be fun for putting initials on a glass jar, like 'C' for cookie.


Happy pinning!

Saturday, July 28, 2012

how to boil an egg?


Here is the direct link for: Do You Know How to Boil an Egg?

Last week I baked my eggs, this week I boiled them. Whoever knew there were so many ways to achieve a simple solid-cooked egg?

This pin comes from the blog, It's Fitting. The blog's author starts out by teaching a little science lesson. She says, "That grey ring around the yolk is actually the iron in the egg yolk reacting with the hydrogen sulfide from the white . . . and only happens when you over cook it."

Here is the basic instructions on how to boil an egg:

One. Place eggs in a pot and cover with water with only an inch cover.
Two. Heat the water on a medium-high heat until water starts to boil. She says, "not just a few bubbles here or there", but a good boil. Turn off the heat. I usually put a lid on my pot, but she doesn't instruct you to do this.
Three. Set the timer for 10 minutes.
Four. After 10 minutes, remove the eggs and plunge them into either ice water or cold water. Let them sit for 5 minutes.
Five. Peel the eggs.

The key to great eggs is paying attention to the details like not doing several things at one time. So then when the timer goes off, I am there ready to plunge the eggs into the cold water, etc. My eggs turned out beautifully, nice and yellow on the inside and no grey rings.

From reading the comments below the blog post (my favorite part about reading a blog), I gleaned a couple new tricks for peeling the eggs:

One. Knock the hard-boiled egg on the counter on the hollow spot of the egg, not the tip end but the other slightly flatter end. And "be sure to get the shell AND the clear membrane started peeling and the rest should come off in a snap."
Two. Once eggs are cool, "put them in a pan with about a half-inch of water, put the lid on, them shake them like crazy. Really crash them into each other. After a bit of this, the shells will come off quite nicely. This idea came from another Pinterest site.
Three. Loosen the shell by first cracking it in a couple of places, then rubbing it gently between your hands to loosen the shell.


I actually tried THREE and it worked great! Nice yellow eggs, no grey ring and now easier to peel.


The red pin award for a great tutorial that I can refer to forever!

Here is the link for my other post on How to make hard-boiled eggs in the oven.


Happy pinning!

Friday, July 27, 2012

caramel apple dip


Here is the direct link for: Caramel Apple Dip.

I needed a quick and unique gift for a friend's birthday. This apple dip looked so yummy and colorful with the green apple. A decadent little treat just for her, with no sharing needed.

This pin comes from the blog, Event Trender. The blog attributes the recipe for this caramel apple dip to Cathy Churilla, the person who initially shared the recipe. The recipe consists of a container of cream cheese, a container of Marzetti's Caramel Dip and a bag of baking Heath English Toffee Bits. Yummy!

It is a quick and easy gift to put together. One batch of dip fills a little more than two half-pint mason jars. A bright bow and a cellophane bag is all the wrapping necessary for this gift. This combination would make for great party favors or wonderful hostess gifts.


The red pin award for 'apple-lutely' delicious! I made one for my family too, but we are mainly eating our dip with a large spoon!!!!!


Happy pinning!

Thursday, July 26, 2012

crock pot banana bread


Here is the direct link for: Crock Pot Banana Bread.

Why would someone even do this? Because the round shape is cute. The wonderful moistness that comes with all things 'crock pot'. No need to heat up the house by turning on the oven! And the house still smells like someone's baking banana bread.

This pin comes from the blog, Smashed Peas and Carrots. It was Maggie's, the blog's author, first attempt at making a bread in the crock pot. She is very enthusiastic and deliciously surprised how moist it turned out. She supplies a recipe and lots of photos, but making banana bread isn't a pretty sight. Sorry to say no matter what angle.

I was curious to see if any recipe would work in a crock pot. Since I already have a favorite banana bread recipe. The two recipes are fairly similar. Why not try it?

In the end, my bread isn't much to look at. It didn't rise very high. My crock pot is a large-sized one, so the bread turned out more like a cake than a loaf. Nonetheless, it was absolutely wonderful! So moist and buttery tasting. I loved it and so did my kids! As you can see from the photo half of it is gone already. We were all pleasantly surprised with the taste.

Today I am including the recipe for my favorite banana bread. It comes from the cookbook Quick Breads. I love this recipe because it uses white sugar rather than brown sugar, so the loaf is lighter, both in texture and in color. It actually looks like banana!

Golden Banana Nut Bread

2 cups all-purpose flour
1/2 tablespoon baking powder
1/2 teaspoon salt
1/4 cup unsalted butter, softened to room temperature
2/3 cup sugar
2 large eggs
1 cup mashed very ripe bananas (2-3 medium-sized bananas)
1/3 cup buttermilk (I used vanilla yogurt)
1/2 cup chopped walnuts, optional

Preheat oven to 375 degrees. Sift flour, baking powder, and salt together into a bowl. In a large mixing bowl, cream butter and sugar with an electric mixer until creamy. While continuing to beat, add eggs one at a time.

Stir in banana, buttermilk and walnuts. Add one-half of the flour mixture and blend thoroughly with a wooden spoon. Repeat with remaining half of flour mixture.

Pour mixture into a greased and floured (bottom and sides dusted with flour) 9-1/4 inch loaf pan. Bake 40 to 50 minutes, until loaf begins to separate from the edges of the pan and a tester inserted into the center comes out clean.

Makes one loaf.


The red pin award for trying something new and unusual!

I had read that you can bake breads in smaller loaf pans within your crock pot too. I want to try this and see if I can achieve a smaller, round little loaf.


Happy pinning!


7/28/2012: Update. Finished the last slice of this banana bread. It has to be the yummiest flavor EVER!! Now I just need to work on presentation, the overall shape of the loaf.

Wednesday, July 25, 2012

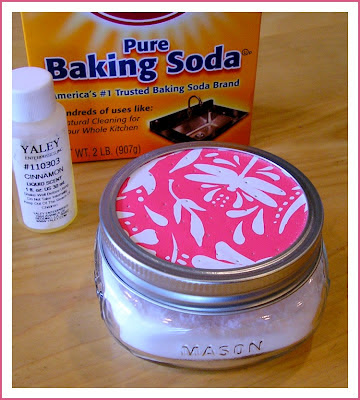
easy baking soda air freshener


Here is the direct link: Easy Baking Soda Air Freshener.

This pin comes from the blog, Smashed Peas and Carrots. The blog's author, Maggie, loves the use of natural home products like this freshener using baking soda and a favorite essential oil. My house needs a little freshening up what with this oppressive heat wave we're having. Our house is so shut up and stuffy!

Maggie says this home-made air freshener is "sooo simple, sooo easy . . . and way better for you than those icky glade sprays and chemically-laden plug-ins!" The decorative lid makes the jar attractive at least. Why not try it?

All I had on hand for essential oil was 'cinnamon' left over from the holidays. Christmas in July? Better than stale and stuffy. I didn't have scrapbook paper either, so instead I used fun wrapping paper. I'm not wowed by the smell yet, but I'm giving it some time to work its magic.

Stay tuned . . . .


The red pin award for easy, as well as, for another great use for all my many mason jars sitting empty in the basement! 

I want to go to Whole Foods and see what other essential oils are out there. I would love to try a lemon one!


Happy pinning!


Tuesday, July 24, 2012

softest, silkiest legs


Here is the direct link for: Softest, Silkiest Legs.

This entry comes from the blog, Gluten Free Navy Wife. The blog's author was in search of a less expensive sugar scrub and ended up making her own. It isn't exactly clear from her blog post what is the direct cause of the softest legs: the sugar scrub, the shaving of the legs twice, the coconut oil or the combination of all of it? But I tried it to find out.

After reading her blog, I realized I already had a jar of sugar scrub sitting in my linen closet. I was given it as a gift and I didn't know what to do with it. It's Tree Hut's Shea Sugar Body Scrub. Tree Hut's link has great info on the benefits of using sugar body scrub.

So I tried the whole routine and the results? Yes, my legs are the softest and silkiest! But I worked hard to get there too. The key is shaving twice and the extra scrubbing. This all helps to exfoliate and rid your skin of that daily buildup of dead skins cells. My legs now feel just like my husband's face does after he shaves.

What I found most interesting with the Gluten Free Navy Wife's blog post were the reader's comments and suggestions at the end. They covered everything from favorite oils to favorite techniques. Below are a few noteworthy comments to share:

One. Scrub your legs first, then shave it off with a razor.

Two. Shave your legs on the side of the tub. The oils from the scrub make the bath water too oily, making for quite a mess to clean up.

Three. The consensus of many was to 1-scrub, 2-shave, 3-scrub again and 4-shave again, in this order. And coconut oil is the preferred oil to moisturize your skin afterwards.

Four. If you want to make your own scrub, try this recipe instead: Mix a whole tube of Dove Oil Treatment Nourishing Conditioner and about 5 cups of sugar together in a jar. The commenter of this suggestion wrote, "It makes the MOST AMAZING smelling and feeling scrub I have ever done." She had tried Gluten Free Navy Wife's recipe and found it a bit greasy.

To be honest, I will buy Tree Hut's sugar scrub again no matter what it cost. I love the lime-coconut smell! I will definitely add this routine to my body care regime.


The red pin award for soft legs and for using up product I already had in my linen closet!


Happy pinning!

Monday, July 23, 2012

meet ben silbermann


Some E-Cards.com
Here is the direct link for: Meet Ben Silbermann. The Brilliant Young Co-Founder of Pinterest.

I pinned this article from the blog, Buisness Insider, quite a while back in the hopes of one day reading it. Well today is the day! It was interesting enough to share the pin with you.

I have often wondered why and how Pinterest got started? And what were their intentions?

The article says that the co-owner of Pinterest, Ben Silbermann, as a child liked to collect all types of things. Ben says in response to this, "What you collect says so much about who you are." He also says, "To me the (Pinterest) boards are a very human way of looking at the world." Pinterest has become an online service for creating your own personal collections of everything from cooking to design to color to hairstyles. The list is endless.

I had never thought about it quite like that before. Pinterest for me has become a way to visually group together what I love and would love-to-love. The bonus is in the ability to share it with so many other like-minded individuals. How fun!

Happy pinning!


Sunday, July 22, 2012

the epic brownie


Here is the direct link for: The Epic Brownie.

This recipe comes from the blog, A Spicy Perspective. The blog's author, Sommer, says this about these brownies, "This is the best brownie recipe I've ever made. And I would never lie about brownies." Well then. She certainly sold me.

This recipe is very chocolate-y. It uses, for starters, a pound of chopped dark chocolate, plus a can of dulce de leche and a cup of chocolate chips in it. Isn't your mouth salivating? I sent my husband to the store to buy these ingredients (because of course I don't have them on hand, too dangerous). He came home with two bags of Nestle's Toll House Dark Chocolate morsels instead of the block of dark chocolate. He said the chips were cheaper. I was a little annoyed at this because they were not the 'block of chocolate' that the recipe requested.

I was skeptical until I actually tasted them. Oh my goodness! Have you ever bought these chips before? I could have eaten the whole bag! Skip the brownies all together, just buy the chips! They are so smooth, so rich. But I digress here, back to the brownies.

The recipe is easy enough to make. It fills a generous 9 x 13-inch pan. Sommer says to bake the brownies 35-45 minutes, but to NOT OVER BAKE them. I checked my brownines at 35 minutes and they were done. I really should of checked them at 30 minutes. They were a bit dry, slightly overcooked. It did not hinder us. And now, half a pan later, who really cares?

Are these brownies epic? To be honest, I haven't a clue. I am not a connoisseur of brownies by a long shot. But I would make them again and highly recommend the recipe.

FYI. Next time stir the mixture only until moistened. And check the baking brownies at 25-30 minutes. My oven tends to run hot. If I pulled them out sooner, they would be a bit more moist and fudgy. And definitely buy Nestle's Dark Chocolate morsels again!


The red pin award for the discovery of Nestle's Dark Chocolate morsels! and the brownie recipe, of course.


Happy pinning!

Saturday, July 21, 2012

heart-shaped paperclips tutorial


Here is the direct link for: Heart-Shaped Paperclips Tutorial.

I am in the process of trying out a new 'best-ever' brownie recipe. It was supposed to be for today's blog post, but is looking more like tomorrow's. In the meantime, I found this fun pin on how to make your own heart-shaped paperclips. I doubt you've any in your desk drawers. I sure didn't, but I have dozens of them now in all sizes and colors!

The link above is the original link on how to make these paperclips. It comes from the blog, Ismoyo's Vintage Playground. Unfortunately, Ismoyo doesn't give any photos on how to make them only the written directions. A photo or two always helps, in my opinion. So for a pictorial, but without much written description, check out this blog, How About Orange.

Heart-shaped paperclips are not hard to make, but can be a bit confusing until you get the hang of it. Remember it's all in the fingers. A simple twist will do it.


The red pin award for clever, simple and whimsical!

Why wait until Valentine's day?


Happy pinning!

Friday, July 20, 2012

the best taco seasoning recipe ever


Original Source for Recipe: Allrecipes.com

Here is the direct link for: The Best Taco Seasoning Recipe Ever.

This pin comes from the blog, What's That Smell? The blog's author, Kim, sold me on this recipe when I read what she had to say, ". . . I have spent the summer trying different taco seasoning recipes that I found on the web, and finally, FINALLY found one that will forever be “our” taco seasoning recipe." Thanks, Kim, for doing all the work for us!

What convinced me even more to try it was when I discovered I had ALL the ingredients already in my cupboard. All of them! We tried it in our taco salads, mixed into the ground turkey. The taste was very light, fresh and a bit spicy!

The recipe calls for one teaspoon of sea salt as one of the ingredients. It was a perfect amount, not too salty at all. The prepackaged taco seasoning, even the low-sodium version, can still be too salty for my tastes, but it sure is convenient.

One batch of the new seasoning equals about three tablespoons. Kim recommends using 2 tablespoons seasoning per one pound of meat. I ended up doubling the recipe to have more on hand for next time.

I am totally converted! I will never buy the prepackaged taco seasoning again! No need.

FYI. Now all I need is a nice little empty spice bottle to place my seasoning in. Penzeys Spices sells a wonderful-size glass bottle with a black lid.


The red pin award for another 'best-ever' recipe!

Thanks again, Kim. I truly appreciate it!


Happy pinning!

Thursday, July 19, 2012

jar with metal holder & wood handles


Here is the direct link: Potpourri Jar with Metal Holder & Wood Handles.

I bought this jar to use as a vase a while back and absolutely love it! I love cut flowers on my kitchen table and the metal lid with the holes (see photo to right) makes flower arranging so much easier. Just a few cuttings goes a long way!

The jar comes from the company, Saves On Crafts. It has a great selection of bottles like this one. I also like this 6-inch jar too. Saves on Crafts offers quantity discounts. For instance, this bottle sells for $9.00. Buying three reduces the price to $8.59 a piece. But you probably make up for the discount with the shipping costs.

Doesn't matter cause I like my vase and already want another! 


The red pin award for a fun find!


Happy pinning!

Wednesday, July 18, 2012

UPDATE! vanilla extract & sugar


Today, July 18th, is one month since I made my batch of vanilla bean extract and vanilla sugar, as shown above.

The sugar smells heavenly! I pulled the bean out admist the sugar and tucked it into my bottle of extract. The more the merrier! Vanilla sugar is great in coffee, on cereal, on toast with butter and cinnamon and I actually have a few recipes that call for vanilla sugar.

The vanilla extract is a rich brown color and smells wonderfully strong! I haven't used it yet in any recipes, but am confident it will be soon. Once I start using it, all I have to do is top it off every so often with a little more bourbon. And after about 6 months, I will add another vanilla bean or two to the bottle to strengthen the flavor. Simple as that!

Here is the link for my original post: Make Your Own Vanilla Extract.


Happy pinning!

french toast waffles


Here is the direct link for: French Toast Waffles.

This recipe comes from Horizon Organic's website. Their tag line for this recipe is "Little ones love this crispy, chewy, sweet and yummy take on a classic breakfast treat!" My daughter, age 14, would agree with the sentiments but being little has nothing do with it!

Waffles always satisfy my love for pattern and texture. And now so do french toast waffles!

This recipe is simple and delicious. I didn't have any square-looking bread on hand, only the traditional loaf-like bread, but Texas Toast would of been perfect! I like the addition of the grated orange zest. It also would be yummy with a few sliced bananas on top of the bread before you lower the waffle iron's lid.

Tomorrow just might be another 'need for texture' day. I'll try the banana-thing with pecan halves sprinkled on top.


The red pin award for the little added 'texture' into my life!

FYI. Remember to buy some Texas Toast!


 Happy pinning!

Tuesday, July 17, 2012

banana pudding poke cake


Here is the direct link for: Banana Pudding Poke Cake.

I absolutely love bananas, and banana breads of all kinds! But I am not a huge fan of banana cream pie. Don't like the chunks of real banana in there. But this recipe promises no banana pieces in it, only the essence of it in the pudding used. Plus this cake received rave reviews from other pinners.

The recipe for this cake comes from the blog, The Country Cook. The blog's author, Brandie, loves all kinds of poke cakes. She has several others for you to try listed at the beginning of her blog entry. The tutorial for this cake gives plenty of photos that make your mouth water in anticipation.

Yesterday, my daughter, Hannah, baked and assembled the cake for me. I so appreciated that. After it had cooled in the refrigerator for about an hour, she cut two pieces for her and a friend. As they took their first bite I watched their faces, curious of their reactions. No real response. So I asked them, "What do you think? Do you like it?" My daughter's friend, being polite and very careful not to offend, said, "It's good and all, but it might taste better without the banana pudding in it." And Hannah totally agreed, "No pin award here, Mom." So I tasted it myself and would say the same thing: Too much banana flavor.

If you LOVE banana pudding, then you'll like this cake. If you don't, don't bother.

No red pin award today. Maybe I should of made the Butterfingers Cake instead!

Happy pinning!


7/18/2012: Cut a piece of this cake and it isn't so bad today. Sitting in the refrigerator for two days has blended the flavors, not so strong a banana flavor like the first day. I also like the moist texture of the cake. It's as if the pudding had been absorbed into the cake more. Still wouldn't make it again though.


Monday, July 16, 2012

needle felting roving balls technique


Unknown source
I couldn't find a direct source for this pin, sorry to say. I was so looking forward to whatever else this site had to offer. For all those that needle felt in the crowd, this idea is quite clever and will save you some time!

What's clever about this technique is step 1, first tying the loose roving into a knot. This gives the ball a firm center right off the bat. Next the 'tails' are simply needle felted to the center knot. Then, WA-LA, the shaping of a felted ball!

The difference between step 2 and 3 is the continual needle felting: poking the ball until it is round, solid, and the desired size. Judging from the size of the above felting needle, I'm guessing the roving ball in step 3 is about the size of your thumb nail.
The above technique is great for the addition of wool beads to whimsical jewelry creations. Or how about a unique fringe on that one-of-a-kind scarf? I plan on using this technique especially for the little needle felted eggs in my Woolly Nest Ornament Kit. Who says this technique is limited to a ball-shape?   


 The red pin award for simple, but very clever!

 
What would you use this technique for?

Happy pinning!